Showing posts with label Gluten Free. Show all posts

Tuesday, December 5, 2017

CREAMY BAKED PASTA


My end goal in life will always be getting as many veggies as I can into my family, haha. I know to some this is not a huge goal, but let's be honest, this is one of those goals that just makes you such a super magical force. When you make THESE AMAZING COOKIES for your family and tell them I'm glad you like because it's made from beans, or this SAUSAGE is made from oats, or this Creamy Baked Pasta is made from CAULIFLOWER, and your 10 year old son looks up at you with huge eyes like you've just solved the Pythagorean Theorem, that my friends is a goal I will forever be reaching for and hope to continue to meet each time I make a dish with hidden veggies! Ok, If you can't tell this was a hit and I'm not sure why I'm surprised because Cauliflower is an amazing versatile ingredient. I've made this a couple different times with a different flare like Mexican (added chili powder and cumin for a taco Mac flavor) and Cajun (I used Tony's cajun seasoning and it was sooo good and a little spicy). I make sure to have a few bags in the freezer for quick and healthy dishes when I just don't have time to think about it.

My oldest daughter asked if I could make a "creamy" pasta. I thought about using a cashew base (too high in fat me to down a huge plate full) or a fat free vegan béchamel (which doesn't offer any nutrients), neither of these really had everything I wanted in a creamy sauce. So I scan the kitchen and decide to change up my Southern Gravy recipe to make it more pasta friendly. This is what I ended up with and the whole family loved it. Let get to it.

Bring a pot of water to a boil and get 1 lb. of pasta pasta of choice started. I used 1 lb. of this Brown Rice Pasta.
Bring a pot of water to boil ADD the following:
  • 16 oz. frozen or fresh Cauliflower
  • 1 small Onion
  • 3-5 large cloves of garlic (we like a lot of garlic I use 5 and it's not overpowering, but I LOVE garlic)
  • 2-4 Tablespoons Sunflower seeds optional (You can use any nut or seed you like. It adds a nice mouth feel, but is totally optional!)

Boil until the cauliflower is tender enough to mash easily. Drain the pot but keep about a cup of the cooking liquid incase you need a little to help blend it. You can watch the video below to see how I pulled it together.

To a blender ADD
  • Drained Cauliflower mixture
  • Tablespoon or 2 at a time of the cooking liquid (don't make it too thin)
  • 1/2 cup Nutritional yeast
  • 1-2 teaspoons Dried Oregano 
  • 1-2 teaspoons Dried Parsley
  • 1-2 teaspoons Garlic powder (yeah, more garlic... optional)
  • 1-2 teaspoons Onion powder
  • 2-3 teaspoons lemon juice
  • 1-2 teaspoons Mushroom Seasoning (optional)
  • salt and pepper to taste (if you are using the mushroom seasoning remember, it's salty)
  • Now's the time to add whatever flavors your going for. This is great as is but really tasty with additional spices like Chili Mac flavors or  Tony's cajun to spice it up!
Blend until smooth and creamy. Add this to your cooked and drained pasta. Mix well, taste and adjust seasoning again if needed. Pour Creamy Pasta into a baking dish and top with Seasoned Bread Crumbs recipe below. Pop into a 375 degree oven until the top is golden brown about 15 mins.

Seasoned Bread Crumbs
  • Panko bread crumbs (I used these). USE GLUTEN FREE IF NEEDED. Options below*
  • 1-2 Tablespoons Nutritional yeast 
  • 1-2 teaspoons each Garlic and Onion powder 
  • 1-2 teaspoons Dried Parsley 
  • Salt and pepper to taste
I hope you make this and enjoy it as much as we do. Don't forget to make this into your own dish and season it up how you and your family enjoy! Then snap a picture and tag me on Instagram tell me what you did different so I can try it too!! MUCH LOVE ~ Des!

PIN IT!!
WHAT THE VIDEO!


Please follow us on social media! I LOVE connecting with you all so much! Here's where you can find us, we are The Plant Eaters on all of them, or you can click the links and you'll find us! Don’t forget to snap a picture and tag us on social media! 

*VEGAN GLUTEN FREE BREAD CRUMBS: Potato bread crumbs I had no idea potato bread crumbs were an actual thing I'm DEFINITELY trying these) or I haven't tries these either these are on my list too, Chickpea bread crumbs. Let me know your favorite Gluten free bread crumbs so I can try them!!!???

*Links are to my Amazon Affiliate link. If you click or buy anything I will receive a commission at NO additional cost to you. It does help our family and we appreciate you support in this way!

Monday, October 30, 2017

CREAMY VEGAN POTATO BROCCOLI SOUP

This soup will warm you to your soul.  It's everything you want in a bowl of soup, comfort, warmth, and filling.


It's getting cooler in many parts of the world. There's really nothing like coming home on crisp cool day to a big pot of hot comforting soup, that fills your belly and warms you straight to your soul. I wouldn't know anything about, that since its still 90°f here in Flordia, and don't even ask about the humidity. But, we don't care, we are craving soup just like a lot of people are this time of year. Soup is so nursing and just dang delicious! We've been enjoying this for dinner and the leftovers are even better. This recipe couldn't be any easier to throw together, here's what you'll need.


Ingredients:
1 Diced Medium onion
1 Bell pepper (I used the mini sweet peppers 2 red and 1 yellow,  green will work too. Use what you like)
2 Stalks of celery
2-3 cloves of garlic
2 carrots diced
4-5 Medium Potatoes (I used Russet baking potatoes because I always have them on hand. If you are using a smaller potato you'll need more,).
1 lb. bag of frozen of fresh Broccoli
1-2 teaspoons garlic powder
1-2 teaspoons onion powder
1 Tablespoon mushroom broth powder (optional)
32oz. Vegetable stock (Here is my absolute favorite it is SUPER flavorful)
2 Cups of water
1/2 cup Nutritional yeast
Salt and Pepper to taste (go easy on the salt if you are using the mushroom powder it's salty)

Directions:
Heat a large pot on medium/high heat. Add diced onion, pepper, celery, carrots, add a little water just to get the party started and cook until the veggies have softened. Add chopped garlic and a little more water to prevent the garlic from burning. Add seasoning and continue to sautée until all the veggies are slightly browned about 5-7 minutes. Add the veggie stock and water bring to a boil, drop the heat a little and cook at a gentle boil for about 5 mins so the carrots can get a head start. Add potatoes cook until just tender. Once the potatoes are tender add 4-5 ladles of the potatoes and veggie to a high speed blender (try not you get too much liquid at this point, the amount of veggies in your pot is up to how chunky you like your soup. I like it pretty chunky so I make sure I have a good amount to potatoes and veggie left in the pot) add a couple of ladles of use the soup liquid to the blender. Add Nutritional yeast and 1 tsp of each of the spices your adding to your soup. Blend until super smooth and thick. Add the blended soup back to the pot, stir and add broccoli and cook until tender.

Please follow us on social media! I LOVE connecting with you all so much! Here's where you can find us, we are The Plant Eaters on all of them, or you can click the links and you'll find us!
YouTube channel
Facebook page
Instagram
Pinterest 

Don't forget to snap a picture and tag my on social media

Watch the video so you can see step by step how I make it.

*Links are to my Amazon Affiliate link. If you click or buy anything I will receive a commission at NO additional cost to you. It does help our family and we appreciate you support in this way!


Thursday, August 3, 2017

CHOCOLATE CHIP COOKIES


I've been tweaking this recipe for what feels like months... wait it has been, haha. I'm glad I waited, because tomorrow is actually National Chocolate Chip Cookie Day, who knew?! What better time to share this AMAZING cookie, so you can be ready tomorrow! My online buddy Karen posted a cookie recipe that was similar, and that got my noggin rattling. I can't keep well enough alone, and wanted a lower fat version so I could enjoy them too. I don't eat high fat due to a horrible problem I once had (but DON'T anymore thanks to WFPBNO eating), that I never want again. I promise I'll give you the scoop on why I eat super low fat, SOON. If you haven't noticed I love making things with oats, SAUSAGE, CHEESE SAUCE, and PANCAKES. Seriously, they are this magical ingredient that I actually used to hate. Hate is a strong word, but I honestly loathed the texture, the lack of flavor, the gummy... goo. You'd never know that now. I have a "shout at the roof tops" kind of LOVE for oatmeal now. I still very rarely eat a bowl of oatmeal, but I use it daily. I also love Chickpeas for a number of reasons and both of these magical ingredients play a large roll in what makes these cookies healthy, without tasting healthy. My oldest hates beans, I still hide them in dishes to get her to eat them, shhhh, gosh don't tell her she will KILLLL me. She loves these and would be the 1st to tell me if they weren't GREAT.

Okay, I'll stop taking about how much I love Oatmeal and Chickpeas because National Chocolate Chip Cookie day is August 4th and I could probably talk about it well past and then we'd miss one of the best food days of the year!


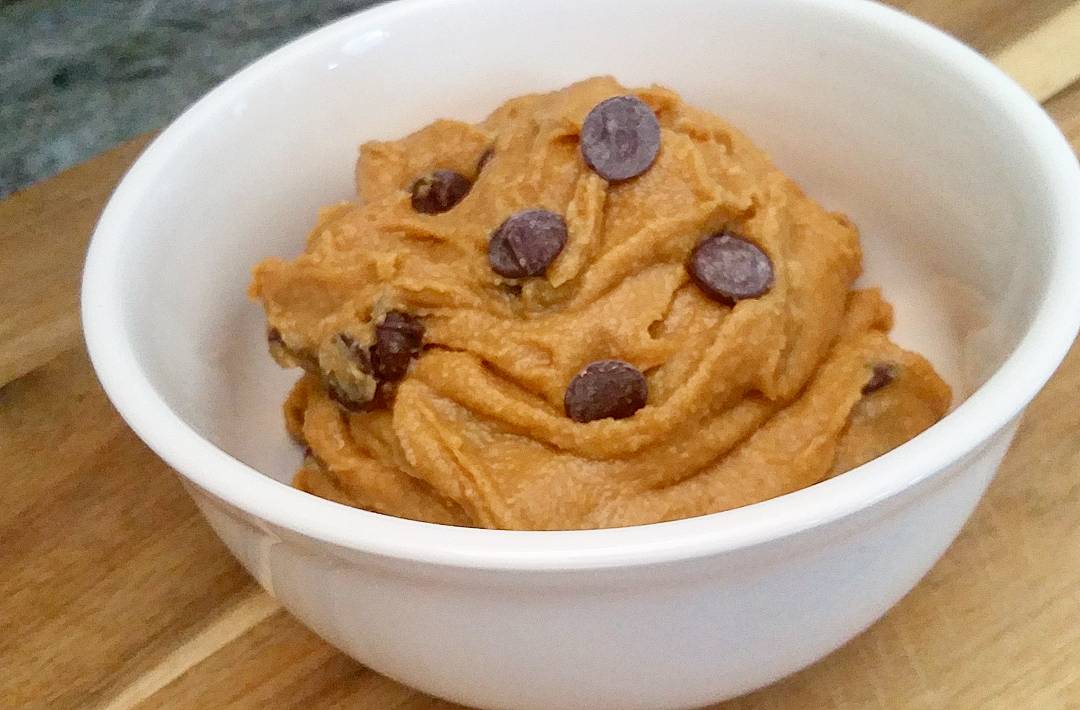
Look at the cookie dough!
Ingredients:
1 1/2 cups cooked rinsed and drained chickpeas (or a 15 oz. drain and rinsed can, unsalted/low sodium)
1/2 heaping cup Oat flour I make it by blending rolled oats in my blender (gluten free if needed)
2/3 cup Vegan Light Brown Sugar lightly packed (or coconut sugar)
3 Tablespoons Maple syrup or Agave for lower glycemic (this is mainly to replace oil)
1 Tablespoon Vanilla extract
1/4 teaspoon Salt (if your chickpeas have a lot of sodium, I would leave it out)
1/2 teaspoon Baking powder
1 teaspoon Vinegar (I used white, but apple cider would work)
1/2 to 3/4 cup Vegan Chocolate Chips ) (I used 1/2 cup, but added a few to the top for photos, That blogger life yo, haha)


                                                            Directions:
Preheat the oven to 375 F. Line a baking sheet with parchment paper. I used a Vitamix blender but a good food processor would work. Add the chickpeas, maple syrup and vanilla, blend until mostly smooth, you will need to use your tamper if using a Vitmix and scrap the sides a couple of time. Add the coconut sugar, oat flour, salt (if using), baking powder and vinegar. Blend until a smooth cookie batter appears before your eyes. Add the chocolate chips and pulse a couple of times just until incorporated. 
Before baking after spreading slightly


Drop a heaping Tablespoon of dough on the lined baking sheet I use this mini scoop. Spread slightly with the back of a wet spoon or wet fingers, these don't really spread while baking. Bake until the edges are dry to the touch, about 18 to 20 minutes, this will depend greatly on your oven. Try not to over bake these, they will get tough. I check them after 18 mins, most of the time they are done. Cool slightly before serving, or burn your mouth off with a lava chocolate chip like I did! Make'em and Enjoy them without guilt! MUCH LOVE ~ Des!
After baking to golden brown perfection and right before burning myself
with that chocolate chip calling your name!


Please follow us on social media! I LOVE connecting with you all so much! You could have seen the kids learning these are made from beans, that was priceless! 
Here's where you can find us, we are The Plant Eaters on all of them, or you can click the links and you'll find us!
YouTube channel
Facebook page
Instagram
Pinterest 


Here's the recipe video so you can see the process, the consistency of the batter and the BEST part, what the KIDS thought when I told me these are made from Chickpeas!


*Links are to my Amazon Affiliate link. If you click or buy anything I will receive a commission at NO additional cost to you. It does help our family and we appreciate you support in this way!

Friday, July 21, 2017

SOUTHERN STYLE WHITE GRAVY


When I said we were breakfast people, I wasn't lying. But honestly, we have this for dinner more than we do for breakfast. You know Binner (breakfast for dinner). I'm sure you agree, pretty much the best thing in the world, is Binner! I've made a few versions of this gravy, and this is our favorite one. I say that every time, but I would not steer you wrong my friend. If you like Biscuits and Gravy look no further, you've come to the right place.

This gravy is so savory with hints of Sage, Rosemary and subtle Smokiness that mimic Country White Gravy that is used in so many Southern dishes. 

Thankfully, I didn't burn these biscuits, which I'm notorious for, Thanks MOM! I kept a hawks eye on these beauties and they turned out almost too pretty to eat...
Here's the link to the Vegan Buttermilk Drop Biscuits

Here's how this Gravy is made:
In a saucepan add following ingredients and enough water to cover.
1 lb. Bag frozen Cauliflower (Don't worry if you don't like Cauliflower you can't taste it)
1 small Onion roughly chopped
2 tablespoons Sunflower seeds (Cashews work too, *optional leave them out if your not eating seeds or nuts) 
1/2 teaspoon Rosemary
1/4 teaspoon Sage 
1/2 teaspoon Garlic powder
1/2 teaspoon Onion powder
Bring to a boil and then simmer until the cauliflower and onions are soft and can be mashed with a fork or spoon.
Reserve the cooking liquid to thin the gravy as needed.
Add the drained mixture to your high speed blender along with
1/4 to 1/2 teaspoon of No Chicken bouillon (I used Better than Bouillon no chicken base http://amzn.to/2gPHkob)
3 drops of liquid smoke (YES exactly 3 no more no less, haha... You can always add more to your taste, but don't over do it, cause it can go wrong... real quick.)
2 teaspoons Mushroom Broth seasoning to taste this is salty so add a little at a time if you're salt sensitive (it is TOTALLY optional, but I use this in a lot of recipes and LOVE IT! Look at your local Asian market it's way cheaper!)
1/2 teaspoon each Rosemary, Sage, Garlic and Onion powder (This is to taste you will need to taste and adjust until it is to you preference. I start with 1/2 and work my way up. 
Blend until super smooth adding a little of the cooking liquid as needed.
Pepper (I use a lot because that is traditional for Southern White Gravy and it's GOOOD!)
Salt (optional, do not add salt until after you have adjusted the bullion and mushroom broth seasoning if you are using it).

Here's the recipe video, it's helpful to see the process so I highly recommend watching it. Plus you can see what the family thinks about it.

I hope you enjoy this dish as much as we do. If you do make it or another recipe please post a photo 
and tag me on Instagram @theplanteaters or follow us here on Facebook
Much Love ~ Des!

*any links to products are purchased and not sponsored, the link is my affiliate link and if you do click or buy it helps us with no additional cost to you.

Monday, July 10, 2017

THE BEST OAT PANCAKES


Naming this post was super hard! There are way too many adjectives that describe these yummy, healthy, easy, satisfying, amazing, delicious, nutritious, kid pleasing, hubby eating, momma loving PANCAKES! Coming up with a pancakes recipe we all loved has not been easy. My oldest daughter wants nothing that tastes healthy, my son wants the texture to be spot on, hubby wants delicious and fast, I want everyone to love them and to be healthy. We all hit the JACK POT!

I'd like to just express one thing. I LOVE OATMEAL!!! I never in a million years would have thought I'd ever even like oatmeal. I hated it as a kid. And honestly, I couldn't care less about the traditional bowl of oatmeal. But the ways I have used this wonderful, nutritious whole grain has been a life changing miracle. I make so many wonderful things that my family absolutely love and I can feel good about feeding them these things in abundance! Check out these family favorite oatmeal recipes that will blow your family's mind. They will have no idea some of them are even made with oats!
There's The Best Nacho Cheese Sauce, Amazing Breakfast Sausage, Fruit Crumbles, A couple Cookies, and these Pancakes!


Here we go:
To a bowl or your blender add all the wet ingredients, then add all dry ingredients. The batter will seem thin, let it sit for a few minutes to allow the batter to thicken up. After you make a couple of pancakes the batter may seem too thick add a splash of almond milk and mix. Cook over medium heat until small bubbles form and pop on the top. Flip and cook until golden brown. You may need to adjust the heat through out cooking, up or down depending on your cook top. 

Wet ingredients 
1 cup non-dairy milk
1 tablespoon vinager  (white, apple cider, any will work)
1 teaspoon vanilla extract 
2 tablespoons maple syrup 

Dry ingredients 
1 1/2 cups oat flour
2 teaspoons baking powder 
1/2 teaspoon baking soda
Pinch of salt optional

Optional add ins
Chopped Pecan (always  add in my opinion) or any nuts 
Chocolate chips
Fruit
Cinnamon 
Pumpkin pie spice 
It's really whatever you like!
ENJOY! 

Sunday, May 7, 2017

THE BEST NACHO CHEESE SAUCE


This Nacho "Cheese'" Sauce has literally been in the weekly meal plan for the last few months! It is so versatile. Change it up to go on broccoli, Mac and cheese, chili cheese dogs! Just play around with it you won't be disappointed!
The kids like is on just about any Mexican inspired dishes!


Here's how to get it done!

Ingredients:
1/2 cup rolled oats
I'm dreaming about these Nacho's
1/4 cup nutritional yeast
2 Tablespoons cornstarch
1/2 red bell pepper
1/2 teaspoon  Chili powder
1/2 teaspoon Cumin powder
1 teaspoon Garlic powder 
1/2 teaspoon Onion powder
2 cups water
Favorite salsa to taste
Pickled jalapeños to taste (optional)
Salt to taste (after you've added the salsa and jalapeños since they can be pretty salty) 

Place all ingredients in a blender and process until very smooth. Pour into a saucepan over medium/high heat, bring to a light boil, stir continuously until thickened, tip do not walk away... it will stick and burn on the bottom of the pot. Add your favorite salsa to taste and adjust any spices if you need more. Serve with these oil free baked tortilla chips or on top of Nacho's or just pour it in a glass and drink it.... nah, you want to savor this sauce! If you have any leftover, pop them in the refrigerator, when you are ready to reheat you can use the microwave or a sauce pan you may need to add a little water to loosen it up just a bit. 
Much Love ~Des


Here's the recipe video if you're interested in seeing how it comes together in about 5 minutes! 

Tuesday, May 2, 2017

VEGAN BREAKFAST SAUSAGE


This has been a hit with the whole family, even the non-vegan extended family! We love breakfast, and this hits the spot EVERY SINGLE TIME! This is always on the weekly meal prep/batch cooking plan. If these aren't within arms reach for the kids, I hear about it! 

I never thought I could replicate the texture and flavor of breakfast sausage but this is as close as I've ever had. I feel good about feeding this to my family on an everyday basis because of the healthy ingredients. I'm busy and completely understand why people reach for pre-made items. With these there is absolutely no need. Have them ready to go when you need them! Make them and see what you think!

I highly recommend watching the video to see the process. Here's the recipe video and what the crew thinks about the breakfast sausage!


INGREDIENTS:

3 1/2 cups water
1/4 cup Bragg’s Liquid Aminos, low sodium soy sauce, or Tamari 
1/4 cup Nutritional yeast flakes
1 Tbsp. Onion powder
1 Tbsp.  Dried Rosemary
1 Tbsp. Maple syrup
2 tsp. Garlic powder
2- 2 ½ tsp. Dried sage
1 tsp. Dried Thyme
1/2 - 1 tsp Liquid smoke
1/8 tsp. cayenne pepper (optional)
3 cups quick-cooking oats
½ Cup of Cooked Rice (optional if you don’t use rice add ½ cup of quick oats)
DIRECTIONS
1. Preheat oven to 350°F. 
2. Line cooking trays with parchment paper
3. Combine all ingredients, except oats and rice, in a medium saucepan; bring to a boil over high heat.
4. Remove from heat; add oats and rice, stir well. Allow mixture to sit 5 minutes.
5. Scoop mixture into 2-inch round balls; place on prepared baking sheet and flatten gently with the back of a wet spoon. Bake 20 minutes; flip sausages and bake an additional 5-10 minutes or until firm.
6. Optional but HIGHLY RECOMMEND Heat non-stick skillet add a little soy sauce and sausage, toss to coat and brown/warm. This gives the outer saltiness that sausage has. Or the last 5 or so minutes of baking brush with soy sauce on each side and continue baking process.
These store well in the fridge and freezer. When storing let them cool after baking and store in fridge or freezer. When ready to eat proceed with step 6. 
ENJOY! But before you do snap a picture and tag me on social media I love seeing all you beautiful creations! Instagram @theplanteaters or on Facebook The Plant Eaters MUCH LOVE ~ Des!

The non-stick cookware I recommend and have been loving. We purchased these and are not sponsored. This is my affiliate link http://amzn.to/2ul7e9a


Please follow us on social media! I LOVE connecting with you all so much! Here's where you can find us, we are The Plant Eaters on all of them, or you can click the links and you'll find us! Don’t forget to snap a picture and tag us on social media! 


*Links are to my Amazon Affiliate link. If you click or buy anything I will receive a commission at NO additional cost to you. It does help our family and we appreciate you support in this way!